Product Documentation

User Instruction Manual for KlearStack

The purpose of the product documentation below is to describe the functionality of KlearStack 6.0.6. For more information contact askme@klearstack.com

The purpose of the product documentation below is to describe the functionality of KlearStack 6.0.6. For more information contact askme@klearstack.com

Getting Started

We Process Supplier Invoices end-to-end, without Defining any Templates!

Using artificial intelligence, KlearStack 6.0.6 automates the capture of invoices and expense reports so that you can quickly pay your payables, with fewer exceptions and lower costs. With KlearStack 6.0.6, we can automate the tedious process of entering unstructured documents.

Using our proprietary machine learning algorithms, we extract structured data from Supplier invoices. Creating and maintaining templates does not need to consume tens of thousands of hours anymore! Boost productivity by up to 200 percent with no setup cost.

Documents we Process

Deriving meaningful value from unstructured documents is where we excel. Unstructured data has been the real challenge in the digital transformation. You have a wealth of valuable content, but no idea how to extract insights out of it. Such data holds tremendous untapped value, and it continues to grow as your organization grows.

We process a wide range of Documents and are constantly expanding our list. The documents we currently support are:

  • Invoices
  • Receipts
  • Purchase Orders
  • Insurances
  • Nach and
  • RFQ

User categories we Support

We presently support three different user categories, each with various levels of access to different components of the KlearStack UI. These categories are:

Admin:
Admin user category has all the rights and access to all the components of KlearStack UI, such as, User management, Field Labels configuration and notifications, etc.

Approver:
Approver user category is mainly intended for document review and approval. This category of user does not have access to User management and configuration settings neither they have rights to create/edit users nor configure fields for any particular company.

Creator:
Creator User category is meant for uploading the invoices, they can edit documents but are not allowed to approve them, neither they are allowed to alter any other user’s credentials nor can they configure fields of any particular company.

Overview of KlearStack UI

KlearStack has one of the most robust and configurable UI when it comes to Document processing. Within its minimalistic design, it contains ton of functionality which takes users document processing experience a nautch higher.

  • Functionalities that make KlearStack so special are:
  • Highly efficient and accurate invoice processing
  • Multiple document type support
  • High customisability
  • Ability to learn from mistakes and retrain
  • Account management for document
  • Integrated with Quickbooks
  • Support for both Indian and Non-Indian Tax systems and many more

KlearStack consists of several components which serves user’s requests flawlessly. Here we will go through every major component of KlearStack system.

Login Page

When user tries to hit any KlearStack instance, he is faced with a login page and is asked with:

  • Username or Email,
  • Password and
  • Company name

Our each instance have access to some particular company only, which makes it impossible to access any data that is not yours, which gives KlearStack an extra bit of safety.

HomePage

Once the User is logged in, he lands to Homepage. This place offers everything, sneak peak to the documents, Document filterisation, customization settings, User management, etc. It also comes with its own Insights with provides with information on the overall confidence and processing time of KlearStack on user’s documents. KlearStack also offers User with functionality to split pdfs so that no unwanted data is uploaded into the System.

Its also provides user with:

  • Ability to upload single or batch of documents.
  • Approve multiple invoices at once.
  • Delete multiple invoices at once.
  • Filter out documents using keywords
  • Check upload history etc.

Let’s have a look at how and where you can access these features and what else is shown at the homepage of KlearStack UI.

Show All

This Tab shows all the Documents currently present in in KlearStack system of the Specific company that the User has access to.

Errors Only

This Tab shows Documents for which KlearStack threw error while processing them. This helps in recognizing Bad Quality documents as well as system errors for better service.

Approved

This Tab shows only those documents which are approved by the User. These documents are considered correct and User wont be able to edit them after approval.

Quick book failed

If Quickbook is set to Enterprise Mode, Quickbooks will try to pull all the approved documents for Billing purposes. This Tab will show all those documents which had wrong entry or Quickbooks threw exception when processing those documents. The error can be seen in the Quickbooks Error box in the Accounts Tab in the detailed-view of that Document. Most prominent reasons for error are :

  • Invalid or Empty Supplier/ Debit Purchase Account
  • Invalid Tax account
  • Empty Split or Line Item Accounts.

Rule exception

This Tab shows documents which fails one or more more rules set by the User in the Rule engine. This helps in filtering out documents that does not fit the criteria set in the Rule Set.

When User open’s detailed view of these documents, He can see which field has caused the rule exception, and details of the rule by clicking on the red exclamation ( ! ) icon above that field.

Another way to view the cause of exception is to visit the rule result tab, here every details regarding the rules, conditions and the error details can be found.

The Upload Status is designed in a Table format with 5 Headers, Batch Name, Upload Time, Complete time, Status and a Soft-refresh button.

  • Batch Name – This column shows the name for the file either Individual of Batch which is/was uploaded by the User. To avoid redundancy in the system, KlearStack adds some extra Characters in the end of the file name, That same name can be seen here.
  • Upload Time – This column shows the exact time upto seconds at which the file was uploaded to the KlearStack System.
  • Completion Time – This column shows the exact time upto seconds at which KlearStack system finished processing the file.
  • Status – This column shows whether a file was processed successfully by the KlearStack system or not.
  • Refresh Header – This header consists of Delete buttons for each entry in the table, I.e. it allows User to delete Upload status entry of any specific file or Batch. The Header also acts as a button to Soft refresh the Upload status data for any updates.
  • Success Status :- When User clicks any Entry, It reveals a status icon, which reveals either the document is processed or Not.
  • Failed Status :- If any document gets a failed status, there can be many reasons for that, Unsupported File type, Corrupt file etc., But if User wants to retry to upload, Instead of Uploading the file/ Batch again, He can simply click on the Failed Status Icon, which will give the User a Button to retry to process the Document.
  • 4. Pagination :- This Option similar to the home page, Gives user a fast way to traverse through neighbour pages by clicking on the index of the page.

    5. Clear Option :- This button allows User to clean all the unrequired data present in the Upload Status section.

  • This button offers user to upload new document or a batch of document directly into the KlearStack app. It accepts multiple file formats like, jpg, png, bmp, pdf etc. and zips containing file of these types. While adding a new Document/ Batch, He have to specify the nature of those documents through a alert windows. KlearStack supports two types of Documents:

    • B2B – These Documents shows the relation/Transaction between 2 parties which both are registered as Businesses and are not addressed to any individual person.
    • B2C – These Documents shows the relation/Transaction between 2 parties, where one is a Business and the recipient part is an Individual.
  • This section shows us the list of documents as per the View tabs with some key information about the Documents. It also provides option to either Approve, Download or delete a Document. This facility can either be accessed by selecting Document’s checkbox or by clicking the Menu button at the end of Entry row.

    Summary view shows the following information about the Documents :

    • There is either a Yellow/Black/Cyan Dot or a green tick in front of every Document row, which tells us if the Document is either Low accuracy/Having Error/High Accuracy or Approved by the User respectively.
    • The column Overall confidence shows us the accumulated confidence score of all the fields predicted by the KlearStack system. User can also set accuracy threshold to classify document predictions as of High or low accuracy.
    • The column File Name shows each document’s file name by which it is stored in KlearStack Database, This column also provides the feature to filter Documents on the basis of Keyword provided by the User.
    • The Invoice Type column inform the User of the nature of the Document. For example, For invoices, Documents can be of multiple type, like Entry Summary, Tax invoice, Telephone Bill, Electricity Bill, etc.
    • Invoice Number/ PO Number/ Insurance No etc. , shows the document index number as stored in the User’s Books. This Number can also be used as primary key for a document.
    • Supplier Name column shows the creater of the Invoice, i.e. It shows the name of the Bussiness the Document belongs to. User can also filter out documents by Supplier Name by providing a Keyword.
    • Invoice Date column shows the document Date, i.e. the date on which the document was issued to the customer.
    • Total column shows the final transaction amount between the Supplier and the customer of the Document. Creation Date column shows the date on which the Document was uploaded into the KlearStack system.
    • Owner column shows the Username of the User who uploaded the the Document to the KlearStack system.
  • This part shows us the page number user is at. In KlearStack UI, each page shows us 10 documents. Using this part we can traverse to any page by clicking on the page numbers.

  • This part shows the total number of documents of the specified document type KlearStack has for the specified User details.

  • This section offers user with the functionality to go to any specified page number instantly instead of manually traversing through page numbers.

  • This button works as a soft refresh button for KlearStack UI. It reloads documents data clearing all the filters applied.

  • This section helps user to filter out documents based on Username, Supplier name and/or, Document date. It has advanced options which can help user to filter out documents with higher accuracy.

Username: Using this field, User can filter files based on their owner.

Supplier Name: Using this field, User can filter out documents of any particular supplier, and can also use this in addition with above filter.

Date Options: Advance filtering provides user with 3 date option which are:

  • Less Than : User can choose a date and result will only show Documents with date before the user provided date.
  • Between : When choosing Between, User can provide two different dates and result will only show documents with date between those two user provided dates.
  • Greater Than : User can choose a date and result will only show Documents with date after the user provided date.

Records per Page: Using this, User can choose how many records he wants to see in the filtered view, By default this value is set to 10 for whole system.

These tabs gives User access to Various additional feature of the KlearStack system. The addition features provided by KlearStack system are:

Home: This tab gives access to Summary and Detailed view of the documents, as well as some actions to interact with those documents and the KlearStack system.

Insight: This tab gives User access to various graphs which plots various matrices of KlearStack system. Using this Tab, User can get an overview of How good KlearStack is performing on their Documents, How accurately each field is getting processed, etc. We will see more on this in upcoming pages.

Split Pdf: As the name suggests, this Tab provides User with the feature to interact with pdfs. User has four actions he can perform using this Tool :

  • Cut Pdf
  • Download Modified Pdf
  • Add/Merge Pdfs
  • Process Document

Detailed View of Documents

We presently support three different user categories, each with various levels of access to different components of the KlearStack UI. These categories are:

This part shows us the name of the file user is currently working with, But it also has a secondary function i.e. as a button, If user clicks on the file name it automatically gets copied.

This button provides user with the ability to download the Document in his local system.

This option facilitates in the deletion of unnecessary files.

This section displays a standard image of the document that the user has opened.

Page change is a button that allows the user to navigate multiple-page documents while also displaying the page number of the page he is presently on.

On the basis of the selected tab, this section displays numerous fields, tables, and other items to the user. This section also aids in detecting processed fields in the document and retraining on specific data.

This button allows user to traverse to the previous document, given that one is accessible. The left arrow key on the keyboard can also be used to access this feature.

This button allows user to traverse to the Next document, given that one is accessible. The right arrow key on the keyboard can also be used to access this feature..

This button provides user with functionality to reset the opened document to its previous saved version. This button is used when User make any amends in the Data but is not satisfy with the changes.

The button provides user with the functionality to register the changes he as made to the fields of the Processed Document.

If the user deems the processed data of the document to be accurate and want to avoid any further editing in the data, He can make it permanent by using the Approve button. None of the User types are allowed to edit an approved document.

To avoid abundance of fields of various types to be shown at one place to the user, the field has been divided into multiple categories. These categories fields can be viewed by visiting their respective Detailed View Tabs.

  • General Tab: In General Tab, all the primary fields of the document can be found. Fields like Invoice Number, Invoice Date, Supplier Name, Total, etc. are present in this tab. This Tab can also be accessed with Keyboard shortcut:- CTRL + 1.
  • Supplier Tab: In Supplier Tab, all the fields relate to the Supplier of the document can be found. Fields like Supplier Name, Supplier Address, GSTN Number, etc. are present in this tab. This Tab can also be accessed with Keyboard shortcut:- CTRL + 2.
  • Customer Tab: In Customer Tab, all the fields relate to the Customer of the document can be found. Fields like Customer Name, Customer Address, etc. are present in this tab. This Tab can also be accessed with Keyboard shortcut:- CTRL + 3.
  • Shipment Tab: In Shipment Tab, all the fields relate to the Shipment of the document can be found. Fields like Shipment Number, Shipment Date, Importer, Shipment Origin and Entry Date are present in this tab. This Tab can also be accessed with Keyboard shortcut:- CTRL + 3.
  • Tax Tab: In Tax Tab, all the Tax fields of the document can be found. CGST, SGST, IGST each with percentage and amount, VAT amount and Total Tax are present in this Tab.
  • Vehicle Tab: In Vehicle Tab, all the fields related to Vehicals can be found. Engine Number, Chessis Number and Model Number are present in this Tab.
  • Push API Tab: Push Api Tab consists of just two fields, Request and its Response. If any error occurs this tab shows the Request sent/generated by the User and the response sent by KlearStack to the User, Both in Json format.
  • Accounts Tab: Accounts Tab provides User with functionality to assign Account Details to Credit Supplier, Debit purchase and Tax. It also Provides the option to split total into multiple accounts based on Value or Percentage. User can also split the total amount between all the line items. This details can also be integrated to Quickbooks.
  • Tables Tab: In Tables Tab, all the data present in the Document in the form of a table can be found. This Tab shows Two tables to the User, First one is Line Item Table, This table shows the table which contains Product Description and Total. The Second Table is Data items Table which consist of all the other information present in the Table format in the Invoice.
  • Miscellaneous Tab: In Miscellaneous Tab, all the other fields of the documents which can’t be categorised in any of the other tabs can be found. Fields like Hypothecation are present in this Tab.

Configuration Settings

For easy and smooth User experience, Klearstack has been designed to be as configurable as possible, where user can alter multiple settings as per his needs.

As of now, KlearStack offers following configuration options :

Fields Switch, Label and Required :

KlearStack allows user to choose between a large variety of Fields to be shown for their documents by toggling the checkbox, For example, Just for Invoices there are 75+ fields available. Each of the field comes with a predefined name, but is changable in the configuration settings by editing its User defined Name. User can also make any field as a required field, i.e. every time before Saving a document, user will be notified for required fields without any value.

All Document types supported by KlearStack offer these settings and can be found in Labels and Notification option in Settings Menu. Each of the Document types has its own Tab for easier manoeuvre.

Fields Switch, Lable and Required

Selected Modules:

KlearStack as of now supports 6 different types of documents as mentioned earlier, But not every user needs all the modules to be enabled, For example, an Insurance company doesn’t need Document type Purchase Orders, and hence can be disabled. In selected Modules settings, User can configure modules or document types he needs by enabling or disabling them accordingly.

Selected Modules

Selected Tabs:

KlearStack as of now supports 13 different Detailed-View Tabs, But not every user have requirement of those tabs, For example, Shipment Tab is only important if User wants to process Entry Summary type of Invoices or Invoices with Shipment details which is very specific need case, and not every User has need for it. User can configure Tabs he needs by enabling or disabling them accordingly.

Selected Tabs

Image Type:

KlearStack support Two different types of Document processing, one for speed and one for Accuracy. Users can choose the type of processing which suits their needs. For example, a User processes limited number of documents per day, but accuracy is more important for him, Image type Accuracy suits his need more than Speed, while for a User, who processes a lot of invoices per day and accuracy needs are not that much high, Speed image type is a better option.

Image Type

Download Format:

KlearStack offers multiple options to download processed Documents like Excel Workbook, Excel Sheet or Json. User can choose whichever default format he seems fit for him.

Download Format

Quickbooks Integration:

QuickBooks integration to the Account Tab of Detailed-View of KlearStack can be controlled from this Tab of Configuration settings. There are three options to choose from, QuickBooks Enterprise, QuickBooks online and Off.

Quickbooks Integration

Tax System:

KlearStack is a global app and we support both Indian and Non Indian tax Systems. Tax system tab provides two configuration, Indian Tax System and Non-Indian Tax system, which user can choose as per is requirement.

Tax System

Notification Settings:

All the notifications like warnings, alerts, popups etc, can be customized in this tab. This section provides User with option to enable or disable certain key notifications.

Notification Settings

Accuracy Threshold:

KlearStack lets User set Accuracy threshold for High Accuracy, Hence User get indicator color based on that and can decide which processed document is of high accuracy vice-versa.

Accuracy Threshold

Push API Status:

The tabs helps user to toggle Push API switch, which enables or disable this based on his/her needs.

Push API Status

Classes:

This tab helps User with :

  • User either can manually enter Classes or Upload a CSV file. These classes will be Used for Account Classification in QuickBooks Integration.
  • User can check/uncheck the box which allows User to enter his own classes in Account tab directly without uploading or entering Here. If unchecked, QuickBooks will throw error for external class.

User Feedback or Retraining KlearStack

Working on User feedback and retraining our proprietary model is one of the most important aspect of KlearStack app. If a User feels that any processed document field/fields value or table is not up-to mark, He can update it by using a simple draw method. This change in data goes to our Backend and then after carefully monitoring the issue, we retrain our model to fit every User’s needs perfectly and difference in results can be observed in just one month.

Correcting a single value field:

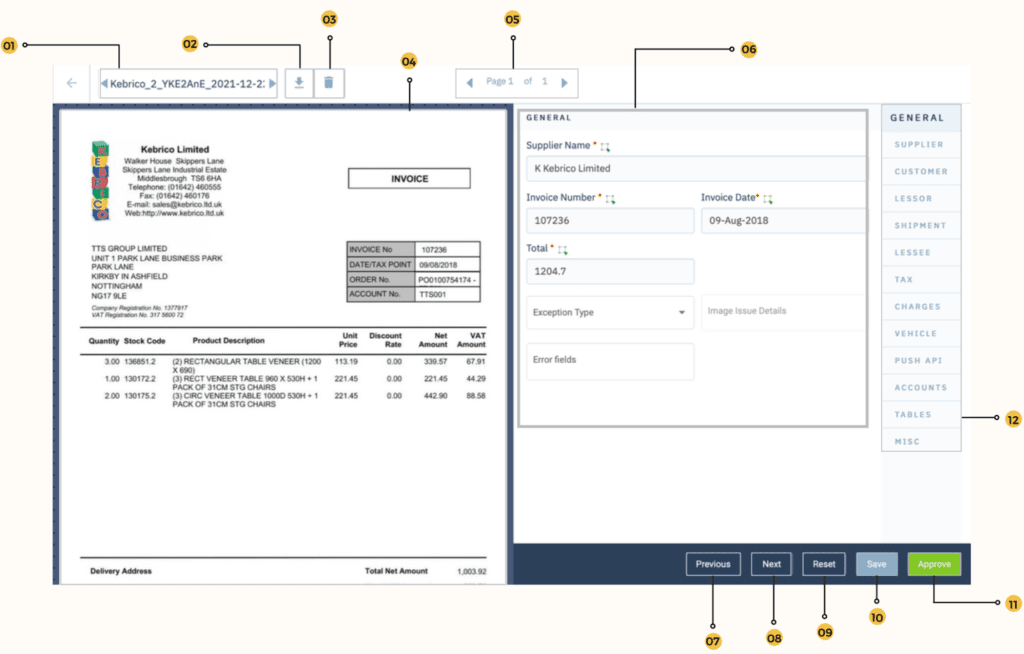
KlearStack allows User to edit most of the field values of Unapproved Documents. This can easily be done Using built in OCR method present at the top of every editable field in form of a green square with a cursor on it. Users can click on green square button against that particular field and select the area on invoice for the respective information. After selection, once he leaves the mouse, entire text selected automatically replaces the old text with the new one and then save the document.

Correcting a single value field

Deleting Table or a row of Table:

If User find any row of the table or entire table to be not up-to mark and delete it, He can do so by clicking on the delete button of the respective row. To delete the entire table, User can use the delete button at the top of the table.

Deleting Table or a row of Table

Draw/Redraw the Table:

If a User wishes to draw/redraw a table he can do so by clicking on Select table area button in Tables Tab which will be visible if there is no table present.

  • User can create a whole table by selecting “Select Table Area” red square. Select area on invoice with full table as its boundary.
  • After full table selection, select each header of the columns by scraping column name (user can select all or any columns depending upon his own wish) from invoice. In the Mapping option, “Description” & “Total” are compulsory mappings. It will not be possible to create table with these two necessary mapping fields. Once done, click on “Send Headers” and all the data of table is shown to user in table form.
  • One more thing to keep in mind is if Supplier name of the Document is already trained, User will be able to delete the rows or entire table, but retraining for table will be disabled.
Draw/ Redraw the Table

User Management

Admin can create different users with this option by adding username, password and role in the company. Below are the three roles for the user:

  • Admin: They can create and edit other user roles, can upload and approve the invoices. They can view and edit all invoices.
  • Approver: They can upload and approve the invoices but cannot create/edit user roles. They can view and edit all invoices.
  • Creator: They can only upload the invoices and save it but cannot approve the invoices. A Creator can view and edit only the invoices uploaded by them.

Admin type user role also possesses the ability to make any other user Active or Inactive by toggling the status button in User management settings. One thing that is not allowed is Deleting any user because if done so, the files uploaded by that user can’t be accessed anymore.

Also through User management, Admin can:

  • Change Username for any User.
  • Change role of any User.
  • Change password of any User.
KlearStack User Management

Change Password

If any User wishes to change his/her password he can do so by navigating to Change Password option present in settings. This part of KlearStack is similar to any other Change Password, User have to enter old password and then New password twice to change it.

If User has forgotten his password, He can request Admin to reset his password for him. Don’t worry, every User’s privacy is secured. Admin is allowed to change any User’s password but he can’t see any old passwords.

How to change KlearStack Password

Import Accounts

This feature allows User to upload new or append to old xls or xlsx files storing Supplier and other account details which will be Used in Account sections and for integration with QuickBooks Services.

  • Supplier Account Master: User can upload or append the existing file (xls or xlsx) by selecting this option. File has a specific format which includes data like Supplier#, Account#, Supplier name, VAT reg# etc. It is used to provide details about supplier.
  • Charts of Account: User can upload or append the existing file (xls or xlsx) by selecting this option. File has a specific format which includes data like Account#, Account name, Description. It is used to provide details about accounts.
How to Import accounts into KlearStack

Rule Engine

The Rule engine is intended to give the user the ability to filter out documents depending on conditions set by the user, i.e., the user can set up to three conditions to correlate fields of any two document types using operators, and he will also have a set of actions to take if a Rule succeeds or fails.

Instead of relying on manual labour to sift through each document, this feature allows the User to construct his own filter. This saves a great deal of time and work while also enhancing efficiency and accuracy.

Rule Engine consists of various modules, we will go through each component one by one.

  • Rule Engine Landing Page: When user clicks on the Rule Engine option in Settings list, He is routed to the Rule Engine landing page, i.e., Rule List. This page shows all the active or inactive rules with Rule name, Description, Status and creation date along with some default actions in a tabular form.
How does KlearStack Rule Engine Work
Rule Engine Settings

In Rule Engine Component, on every page User has access to the settings icon, which makes traversing in-between different settings smooth and easier.

Rule Engine Path

When working with a system with lots of layers, like KlearStack’s, having interactive Path option to go on any desired layer back and forth makes it a lot easy for User to traverse between different views.

KlearStack Rule Engine Logout

This button provides user with option to logout from the KlearStack UI directly from the Rule engine, avoiding going back to dashboard.

How to create new rule in KlearStack

This button provides User with functionality to create a new rule in the KlearStack system. He can either make the rule active while creating or save it in inactive state.

KlearStack Rules List

This Part of the Rule Engine Landing page shows all the active or Inactive rules, along with their description, status and creation date.

KlearStack Rule Engine Actions

In the Rule List table. User has access to some actions to help him interact with the rules already present in the table. These actions are:

  • Edit Rule – This action helps user in editing an existing inactive rule. Only inactive rules are allowed to be edited. When user clicks on this icon, He is routed to the edit view where he can view all the rule details and make it active if needed.
  • Copy Rule – This action facilitates user in copying a rule as it, which is available to User for further editing, Using this feature, User can make newer or modified version of any active rule, which he was unable to edit.
  • Delete Rule – Using this Button, User is allowed to delete any active or Inactive rule. Active rules can’t be disabled, hence the only way to stop the execution of that rule is to delete it. This function along with multiple rule deletion can be accessed via, the checkbox present in the rule list table. Using it User can delete one or more rules at once.

Create New Rule Page

When the User clicks on Create new Rule, He lands on Create a new rule page. User is allowed to set up to 3 conditions to match his requirements. User is provided with multiple options to work with, We will go through everything the Create New Rule Page has to offer.

KlearStack New Rule Page
Rule Name | KlearStack Rule Engine

This Text box helps user to Enter the name for the New Rule. This name will be used everywhere when referencing this rule. The Rule Name has a character limit of 30.

Rule Error Message | KlearStack Rule Engine

This Text box helps user to enter a customized error message when the rule fails on any document. This helps User getting a clear understanding of what it means when this rule fails.

Enable Rule Engine Button

Using this button, User can either Enable or disable any rule when creating it. Once the rule is enabled and saved, it can not be disabled again and is available as read only. Disabled rules can be enabled by clicking on the rule to view rule details.

Rule Description

Using this Box, user can enter any data which he feels describes the following rule the best as per his understanding. The main purpose of this feature is to help User keep track of what the original purpose of the rule is.

Rule Engine | When DropDown

Using this dropdown, User can choose on which Document type he wishes to apply this specific rule. Any rule can only be applied on any one specific document type. In the dropdown User gets to choose between all 6 document types KlearStack currently supports.

KlearStack Rule Engine Document Status

In this dropdown, User chooses the document status to whom the rule will be applied once it is enabled. User gets three options here:

  • Processed – When User choose this status, the rule is applied to every document of the specified type that comes for processing. For example, If the document type is Invoices, every time User will upload an Invoice for processing, the rule will be applied on it.
  • Approved – When Approved is chosen, The respective rule is only applied to the documents that User approves. For example, if the document type is Invoices, Every invoice that user approves, this rule will be applied on it..
  • Deleted – When User chooses Deleted, the rule is applied to the document when it is deleted by the User, He won’t be able to see the rule status, but the respective action will be executed. For example, for document type Invoice the action is set to Email the User in this rule, whenever User deletes an invoice that passes the condition, He will be notified on the mail he has provided.
Any All. Rule Engine

Through this dropdown, User can choose How the following conditions will be implied when the rule is applied to any document, and thus the action to take will be decided. Here the user gets to choose between 2 options :

  • Any – When Any is selected, if any one of the conditions stands True, the rule is considered to be passed and the action is executed.
  • All – When All is selected, for rule to be passed, all the conditions should stand True, i.e. If all the following conditions are True, then only the action will be executed.

Before we go into Conditions, let’s have a look at how conditions function. This will help the User understand the options available to them. When discussing conditions in general, we require three things: value 1, a comparison operator, and value 2. For the sake of example, pretend value1 is “User,” operator is “starts with,” and value2 is “U.” When evaluating this condition, the result is True, however if value1 is 5, operator is “equals,” and value2 is 3, the result is False.

For conditions, when using KlearStack’s rule engine, the user selects a document type and a field to act as value 1, then selects an operator, and value2 can be another field of any document type or a text box for the user to enter value. When the rule is run, it determines if the weather circumstances are True or False.

We’re now ready to go deeper into the conditions and the selections available to the user.

Condition Name

This Text box helps user to Enter the name for the New name. This name will be used everywhere when referencing this condition. The Condition Name has a character limit of 30.

App 1 KlearStack

Through this dropdown, User chooses the document type for the First value of the conditions. User can choose between three different document types available to him :

  • Invoices
  • Receipts and
  • Purchase Orders
KlearStack App 1 Field

In this dropdown, User is provided with fields as options to choose for first value of the Condition. The Options depends upon the selection of App 1. The list of fields based on App1’s type are :

Invoices – If in App 1, User chooses Invoices then as fields he is given these as options :

  1. PO Number
  2. Invoice Number
  3. Invoice Date
  4. Supplier Name
  5. Customer Name
  6. Total

Purchase Orders – If in App 1, User chooses Purchase Orders then as fields he is given these as options :

  1. PO Number
  2. Order Date
  3. Supplier Name
  4. Customer Name
  5. Total

Receipts – If in App 1, User chooses Receipts then as fields he is given these as options :

  1. Receipt Number
  2. Receipt Date
  3. Supplier Name
  4. Customer Name
  5. Total
KlearStack Operators
  • As of now, KlearStack supports 14 different types of operators, we will go through each one of them and see what they do:
  • Equal to (=) – Using this operator, User can compare the first value i.e. App1’s field to the to the second value to check if they are equal or not.
  • Contains – Using this operator. User can check if the second value is a sub-string of the first value, i.e. second value comes in first value. For example, “eat” is a sub-string of “Creator”.
  • Not Contains – Using this operator, User can check if the second value is not a sub-string of the first value, i.e. second value doesn’t come in first value. For example, “fast” is not a substring of “haste”.
  • starts with – Using this operator, User can check If the first value starts with the second value, For example, “Faster” starts with “Fas”.
  • ends with – Using this operator, User can check if the First value ends with the second value, For example. “Headphone” ends with “phone”.
  • fuzzy match – Using this operator, User can compare the similarity between first and the second value, if the similarity is above the threshold, the condition stands true.
  • Pattern match – Using this operator, User can if First and second value have any matching pattern or sequence of tokens.
  • Is Empty – Using this operator, User can check if the the first value is empty or not.
  • Between – This operator is used when the first field is of type Date. Using this operator user can check if first value lies between the user provided values or not.
  • Future Date – Using this operator user can compare first value with the second value to check if the second one is a future date or not.
  • Past Date – Using this operator user can compare first value with the second value to check if the second one is a past date or not.
  • Is Today – Using this operator, User can check if the the date field selected as first Value has the same value as Today’s date or not.
  • Greater Than ( > ) – Using this operator, User can numerically compare first and second value, condition will return true, if the first value is greater than the second value.
  • Less Than ( < ) – Using this operator, User can numerically compare first and second value, condition will return true, if the first value is less than the second value.
KlearStack Parameter

Using the Parameter dropdown User can choose weather he want to manually enter the second value or select a document type and its respective field instead.

  • Equal to Field – Using this parameter User can opt to choose document type and its respective field to act as a second value.
  • Equal to Exact Value – Using this parameter, User can opt to manually enter the second value for comparison in the condition.
KlearStack Second Value

In this part, User can enter the second value for the comparison in the condition based on the parameter selected. The second value can be provided by two ways based on the parameter as explained in the above explanation.

  • Case 1 – In first case, User can opt to select document type and it’s respective field, as can be seen in the Condition one in the above image.
  • Case – 2 – In second case, User can opt to enter the value manually, as can be seen in the condition 2 in the above image.
KlearStack Error Message

This Text box helps user to Enter a customized error message for the specific condition. This error message can help User to understand why the following conditions have failed or What it means when the condition fails. This error message will be visible in Rule Result tab of Detailed – View of that Document given the condition fails.

KlearStack Action

In this section, User can choose what action to take, if all or any of the conditions pass, i.e. the rule passes. User is provided with 3 options to choose from :

  • Pass this Rule – When User opts for this Action, Whenever the rule passes, the rule result for that document is set as Passed and can be viewed in the Rule Result tab of Detailed-View of that Document.
  • Execute another Rule – When User opts for this Action to be taken, he is provided with a new dropdown to choose an existing rule, which will execute if this rule passes on the document.

#Note – For another rule execution, in the dropdown, User is only provided with rules for whom, action is not set for execution of another rule. This is done to prevent chaining, If not done, system could get stuck in a deadlock.

  • Send Email – If User wishes to get notified every time the rule passes, he can opt for send mail, User will be provided with a text box where he can enter up to 7 emails. Every time the rule passes for a document User will be notified on the mails provided by him.
KlearStack Send Email

Correlation Between Fields and Operator

KlearStack’s rule engine currently support 14 different operators, but not all operators are available for use with every field. This has been done to prevent creation of non-meaning full or error causing rules. There are currently 4 types of field supported in the Rule engine and while some operations are common among the three categories, there are some operations which are available to use with a single category of fields.

For a better Demonstration lets see the categories and supported operations.

Date Fields – Invoice Date, PO Date, Receipt Date, etc.

Supported Fields for this category are :

  • Equal to
  • Between
  • Future Date
  • Past Date
  • Is Today
  • Pattern Matching
  • Is Empty

Document Index Number – Invoice Number, PO Number, etc.

Supported Fields for this category are :

  • Equal to
  • Contains
  • Not Contains
  • Starts with
  • ends with
  • fuzzy matching
  • Pattern Matching
  • Is Empty

String Names – Supplier Name, Customer Name etc.

Supported Fields for this category are :

  • Equal to
  • Contains
  • Not Contains
  • Starts with
  • ends with
  • fuzzy matching
  • Is Empty

Float Values – Total

Supported Fields for this category are :

  • Equal to
  • Greater than ( > )
  • Less than ( < )
  • Between
  • Pattern Matching
  • Is Empty

Things to Keep in Mind when Working With Rule Engine

  • Once a Rule is enabled, it can’t be disabled, it can only be deleted by the User.
  • To view or edit Rule Details, User can click on the Rule name in the Rule Landing Page.
  • If User wants to modify an enabled or active rule, He can use a roundabout, i.e. He can copy the rule modify the new one, make it active and then remove the old one.
  • Rule Engine is still in its Development Phase, and will only improve in the future and a lot of new feature are on their way.

Selected Modules:

KlearStack as of now supports 6 different types of documents as mentioned earlier, But not every user needs all the modules to be enabled, For example, an Insurance company doesn’t need Document type Purchase Orders, and hence can be disabled. In selected Modules settings, User can configure modules or document types he needs by enabling or disabling them accordingly.

Selected Modules

Selected Tabs:

KlearStack as of now supports 13 different Detailed-View Tabs, But not every user have requirement of those tabs, For example, Shipment Tab is only important if User wants to process Entry Summary type of Invoices or Invoices with Shipment details which is very specific need case, and not every User has need for it. User can configure Tabs he needs by enabling or disabling them accordingly.

Selected Tabs

Image Type:

KlearStack support Two different types of Document processing, one for speed and one for Accuracy. Users can choose the type of processing which suits their needs. For example, a User processes limited number of documents per day, but accuracy is more important for him, Image type Accuracy suits his need more than Speed, while for a User, who processes a lot of invoices per day and accuracy needs are not that much high, Speed image type is a better option.

Image Type

Download Format:

KlearStack offers multiple options to download processed Documents like Excel Workbook, Excel Sheet or Json. User can choose whichever default format he seems fit for him.

Download Format

Quickbooks Integration:

QuickBooks integration to the Account Tab of Detailed-View of KlearStack can be controlled from this Tab of Configuration settings. There are three options to choose from, QuickBooks Enterprise, QuickBooks online and Off.

Quickbooks Integration

Tax System:

KlearStack is a global app and we support both Indian and Non Indian tax Systems. Tax system tab provides two configuration, Indian Tax System and Non-Indian Tax system, which user can choose as per is requirement.

Tax System

Notification Settings:

All the notifications like warnings, alerts, popups etc, can be customized in this tab. This section provides User with option to enable or disable certain key notifications.

Notification Settings

Accuracy Threshold:

KlearStack lets User set Accuracy threshold for High Accuracy, Hence User get indicator color based on that and can decide which processed document is of high accuracy vice-versa.

Accuracy Threshold

Push API Status:

The tabs helps user to toggle Push API switch, which enables or disable this based on his/her needs.

Push API Status

Classes:

This tab helps User with :

  • User either can manually enter Classes or Upload a CSV file. These classes will be Used for Account Classification in QuickBooks Integration.
  • User can check/uncheck the box which allows User to enter his own classes in Account tab directly without uploading or entering Here. If unchecked, QuickBooks will throw error for external class.

Insights

This section of KlearStack UI is designed to provide User with a Fortnight-wise Graphical brief on various performance metrics of KlearStack. This part Shows three different Line graphs:

  • Accuracy: This Graph shows a percentile value Line graph of number of fields that were predicted wrong and have been corrected by the User, for a specific company.
  • Uploaded and Approved: This Graph shows two line graphs, First one Shown with green color is for number of documents uploaded by the User for a specific Company in the past Fortnight. Another one shown with Brown color is for number of documents Approved by the User for the specific company.
  • Field-wise Accuracy: This Graph shows a percentile value Line graph for accuracy of Each field, i.e. User is allowed to choose the field he needs insight for, and for the selected field, the graph shows the line graph for percentile value of ratio of number of times value for the specific field have been corrected by the User by total number of times the field has been predicted by KlearStack in last fortnight.

User is also provided with the choice for the Fortnight He wants Insight for.

KlearStack Insights

User is provided with lots of options for in graph interactions, which can be found in form of icons on the top of the graph. One of which is Bar graph view, clicking on it will change the graph form to a Bar Graph.

KlearStack Charts and Graphs

KlearStack also provides users with an option to Export the insight in form of Pdf. This feature can be accessed by the button in the top-right corner labeled as “Export as Pdf”.

Selected Modules:

KlearStack as of now supports 6 different types of documents as mentioned earlier, But not every user needs all the modules to be enabled, For example, an Insurance company doesn’t need Document type Purchase Orders, and hence can be disabled. In selected Modules settings, User can configure modules or document types he needs by enabling or disabling them accordingly.

Selected Modules

Selected Tabs:

KlearStack as of now supports 13 different Detailed-View Tabs, But not every user have requirement of those tabs, For example, Shipment Tab is only important if User wants to process Entry Summary type of Invoices or Invoices with Shipment details which is very specific need case, and not every User has need for it. User can configure Tabs he needs by enabling or disabling them accordingly.

Selected Tabs

Image Type:

KlearStack support Two different types of Document processing, one for speed and one for Accuracy. Users can choose the type of processing which suits their needs. For example, a User processes limited number of documents per day, but accuracy is more important for him, Image type Accuracy suits his need more than Speed, while for a User, who processes a lot of invoices per day and accuracy needs are not that much high, Speed image type is a better option.

Image Type

Download Format:

KlearStack offers multiple options to download processed Documents like Excel Workbook, Excel Sheet or Json. User can choose whichever default format he seems fit for him.

Download Format

Quickbooks Integration:

QuickBooks integration to the Account Tab of Detailed-View of KlearStack can be controlled from this Tab of Configuration settings. There are three options to choose from, QuickBooks Enterprise, QuickBooks online and Off.

Quickbooks Integration

Tax System:

KlearStack is a global app and we support both Indian and Non Indian tax Systems. Tax system tab provides two configuration, Indian Tax System and Non-Indian Tax system, which user can choose as per is requirement.

Tax System

Notification Settings:

All the notifications like warnings, alerts, popups etc, can be customized in this tab. This section provides User with option to enable or disable certain key notifications.

Notification Settings

Accuracy Threshold:

KlearStack lets User set Accuracy threshold for High Accuracy, Hence User get indicator color based on that and can decide which processed document is of high accuracy vice-versa.

Accuracy Threshold

Push API Status:

The tabs helps user to toggle Push API switch, which enables or disable this based on his/her needs.

Push API Status

Classes:

This tab helps User with :

  • User either can manually enter Classes or Upload a CSV file. These classes will be Used for Account Classification in QuickBooks Integration.
  • User can check/uncheck the box which allows User to enter his own classes in Account tab directly without uploading or entering Here. If unchecked, QuickBooks will throw error for external class.

Split Pdf

KlearStack also comes equipped with a pdf splitter tool which helps user to split pdf or choose specific pages to be uploaded in the KlearStack system. Features offered by Split-Pdf Home page are:

Cut Pdf : This feature allows user to split a multipage document into multiple different parts. For example, If a User has a 9 page document containing 3 individual documents with 3 page each, Using this tool he can easily convert that document into 3 different documents and upload them to KlearStack.

Download Modified Pdf : This feature allows user to Download his modified documents into a form of a zip file. For example, with reference to the Cut Pdf example, Using Download Modified pdf tool user is allowed to download all individual pdfs as a zip file.

Add/Merge File : This feature allows user to merge pdfs together. Using this tool User can create a mash-up of multiple documents together.

Process Document : This feature allows user to process the modified documents, i.e. Using this tool User can send the modified or merged document for processing into the KlearStack system

Split PDF with KlearStack

Working with KlearStack

In this part of Documentation, we will describe the steps a new User to take to get started with processing his documents for field extraction:

  • Login into KlearStack 6.0.6 by given URL and Username/Password sent through mail.
  • Change the Password for Security reason under “Change Password” tab.
  • Go to Invoices tab and Click on “Add New” button to upload the Document.
  • Select Documents in pdf, jpg, tiff or bmp formats and click on “Open” to upload. You can choose single/bulk upload.
  • After processing the Document, it is displayed on the Invoices home page, into its module/Document type along with the extracted fields.
  • Click on the Document to open the Detailed-View.
  • Left pane of the screen displays the image of the original document and Right pane displays all the extracted data.
  • Validate all the fields and edit the values, if needed.
  • Save or Approve the document and click on back arrow button to go back to the main menu page.
  • Once the invoice gets approved, in the Invoices home page, a green tick appears near Document reference number like Invoice number. This implies that the document is approved and is available to download.
  • User can avail the “Download” option to export the results into excel spreadsheet only for the approved invoices.

Notes

When using KlearStack, User should keep some key points in mind to avoid any confusion or ambiguity:

  • Accuracy for machine generated invoices is higher than scanned and handwritten documents.
  • KlearStack 6.0 currently supports English language only.
  • All the validations and errors messages will be shown for user convenience.
  • Accuracy is a factor of quality of scanned invoices. For 250 DPI clean scan, around 65-70% accuracy is seen in the beginning. The accuracy will go up as we retrain our AI/ML models. We retrain our models on a continuous basis and deploy newer models as those are retrained. During trial period, we can deliver 93.5% accuracy within 1 month. Likewise, we will continue to improve going forward as well.
  • KlearStack support data extraction from a multiple page invoice.
  • Upload only one file per invoice. One file should not contain multiple invoices. E.g. KlearStack don’t support the scenario when page 1 and 2 belong to invoice 1001 of Vendor 1 but pages 3, 4 and 5 belong to invoice B123 of Vendor2. The user needs to ensure there is one file per invoice – whether it is a single page or multi-page invoice.
  • KlearStack support PDF, JPG, BMP and TIFF file formats. It also supports ZIP file that contains any of the 4 supported file formats (PDF, JPG, BMP and TIFF).
  • A single file (PDF, JPG, BMP or TIFF are supported. Although multi-page invoices are either in PDF or TIFF format) can contain one invoice with multiple pages of the same invoice. E.g. invoice number 1001 from Vendor1 has many line items that do not fit into 1 page. In such a case, the invoice would extend beyond one page. However, all the subsequent pages will belong to the same invoice # 1001 from Vendor1. The subsequent pages will not belong to either a different invoice from the same supplier or a different invoice from a different supplier.
  • While uploading zip batch file, KlearStack will process invoices with single page on priority.